Cloudflare R2: Bucket Creation, Access, and CommercePad CDN Setup Guide
This guide provides step-by-step instructions for creating and managing public and private R2 buckets, uploading content, connecting via Cyberduck, and configuring CDN storage in CommercePad.
1. Creating an R2 Bucket
- Log in to your Cloudflare account and go to Account Home.
- Select R2.
- Click Create Bucket.
- Fill in the bucket details:
- Bucket Name: Use all lowercase letters, e.g.,
- Public bucket: r2-bucket-example
- Private bucket: r2-bucket-example-private
- Location: Automatic.
- Bucket Name: Use all lowercase letters, e.g.,
- Click Create Bucket.
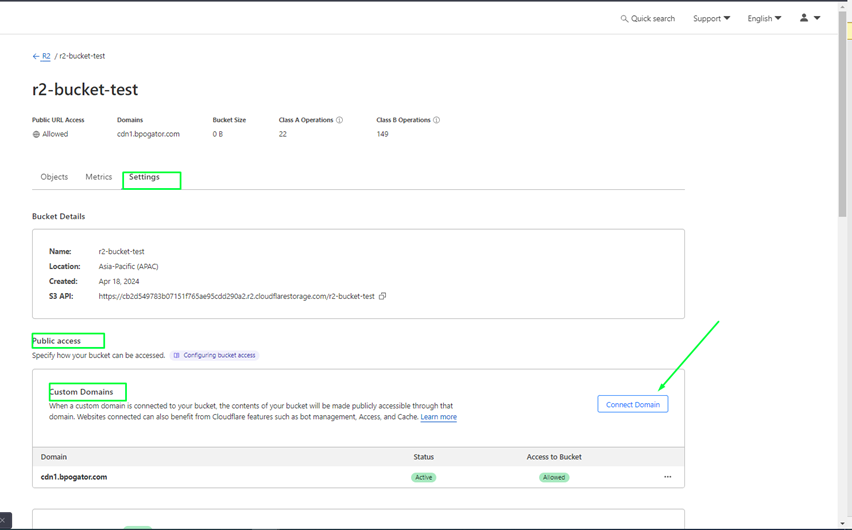
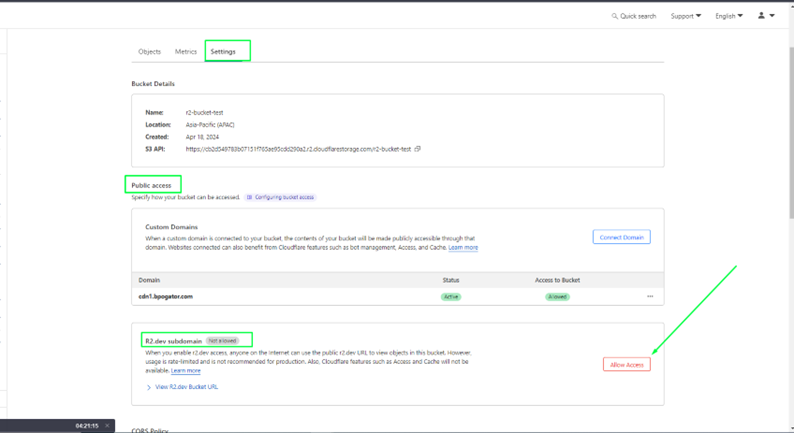
2. Making a Bucket Public
For Custom Domains:
- Open your bucket and go to Settings.
- Under Public Access, select Custom Domains → Connect Domain.
For Default R2.dev URL:
- Open your bucket and go to Settings.
- Under Public Access, select R2.dev subdomain → Allow Access.
Note: Private buckets do not require public access.
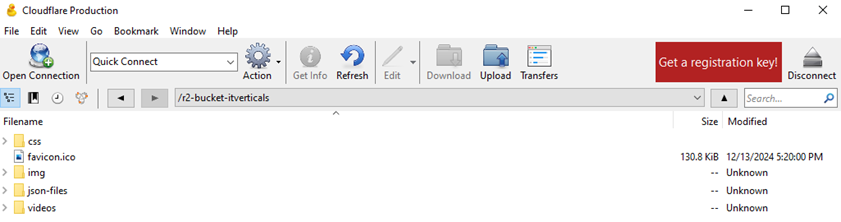
3. Uploading Files and Folders
- Ensure all file and folder names are lowercase.
- Required structure for your R2 bucket:
css/ , img/ , json-files/ , videos/ , favicon.ico
4. Creating API Access for Buckets
- Go to Account Home → R2 → Manage R2 API Tokens.
- Click Create API Token.
- Enter a name for the token.
- Select Permissions based on your needs:
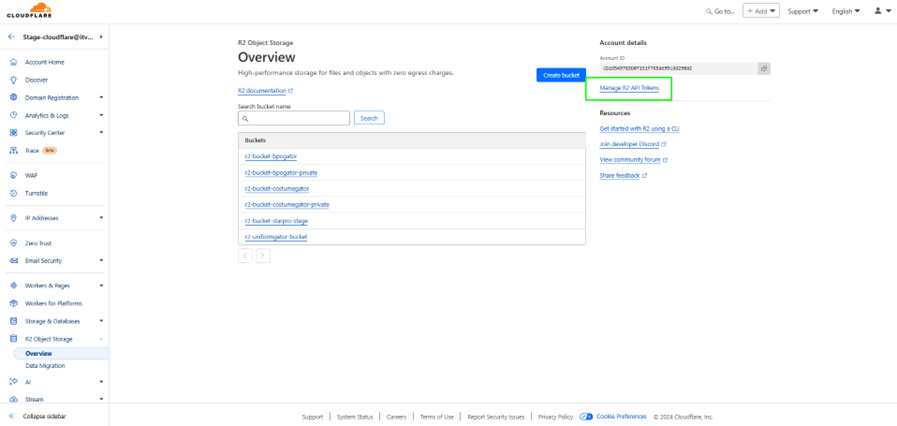
| Permission Type | Description |
| Admin Read & Write | Create, list, delete buckets; edit configs; list/write/read objects |
| Admin Read Only | List buckets and view configs; list/read objects |
| Object Read & Write | Read, write, and list objects in specific buckets |
| Object Read Only | Read and list objects in specific buckets |
- Select the specific buckets.
- Click Create API Token.
Tip: Use Admin Read & Write for full bucket management and Object Read & Write for content management only.
5. Uploading Content Using Cyberduck
Requirements:
- Cloudflare R2 API Access ID and Secret Access Key.
Step 1: Install Cyberduck
- Download from cyberduck.io and install.
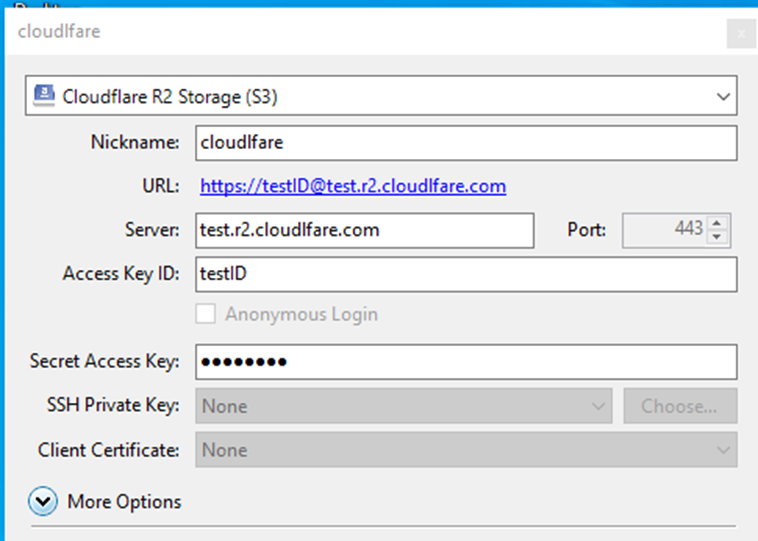
Step 2: Add Cloudflare R2 Profile
- Open Cyberduck → Edit → Preferences → Profiles.
- Search for Cloudflare R2 Storage (S3) and enable it.
- Close Preferences.
Step 3: Connect to R2 Bucket
- Click Open Connection in Cyberduck.
- Select Cloudflare R2 Storage (S3).
- Enter:
- Server URL: Provided in Cloudflare (without https://)
- Access ID
- Secret Access Key
- Click Connect Now.
You are now connected and can upload files and folders to your R2 bucket.
6. Private Bucket Notes
- Private buckets do not require public access.
- Use API tokens to manage and access content programmatically.
- Naming convention: r2-bucket-example-private
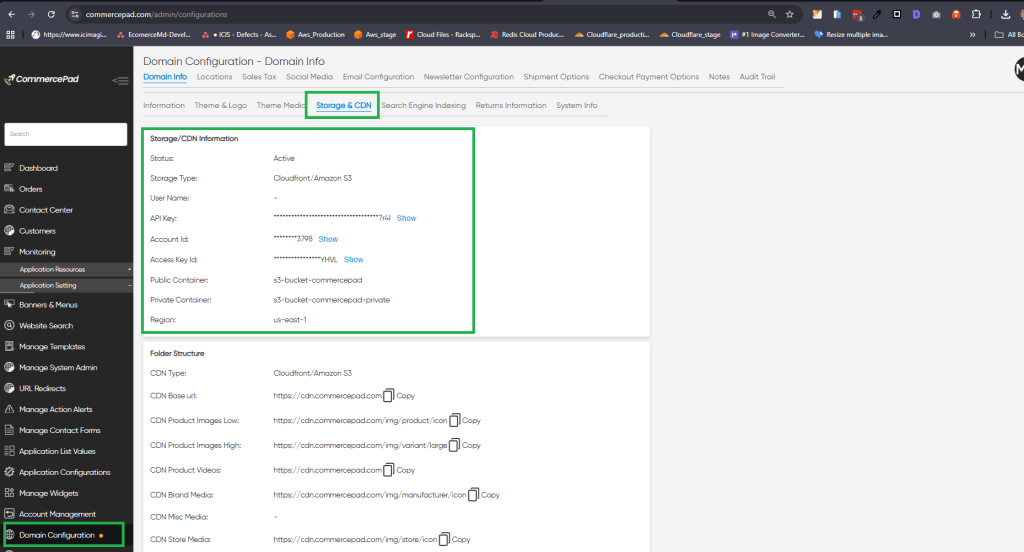
7. Configuring CDN Storage in CommercePad
- Log in to your CommercePad Admin.
- On the left menu, go to Applications Settings → Domain Configuration.
- Select Storage & CDN.
- Update the storage and CDN settings with your Cloudflare R2 bucket details (ensure the bucket names follow the all lowercase naming convention).
This allows CommercePad to serve static assets (images, CSS, JS) directly from Cloudflare R2 for faster content delivery.